Note: The screenshots used in this guide are from Unreal Engine 5 (Preview 1) but everything here is compatible with most previous and future versions of Unreal Engine (4 / 5 / beyond).
Overlap and Hit events are similar functions with two distinct use cases; as the names imply the Overlap Events are for when an actor is overlapping us (or is no longer overlapping us) and Hit Events are reserved for when something has hit us (and gives us information such as the location of the hit, the actor that hit us .etc).
We will look at four examples; One for Blueprint, One for C++ then multiplayer-friendly variations.
Examples
Example #1 - Target Practice (Blueprint)
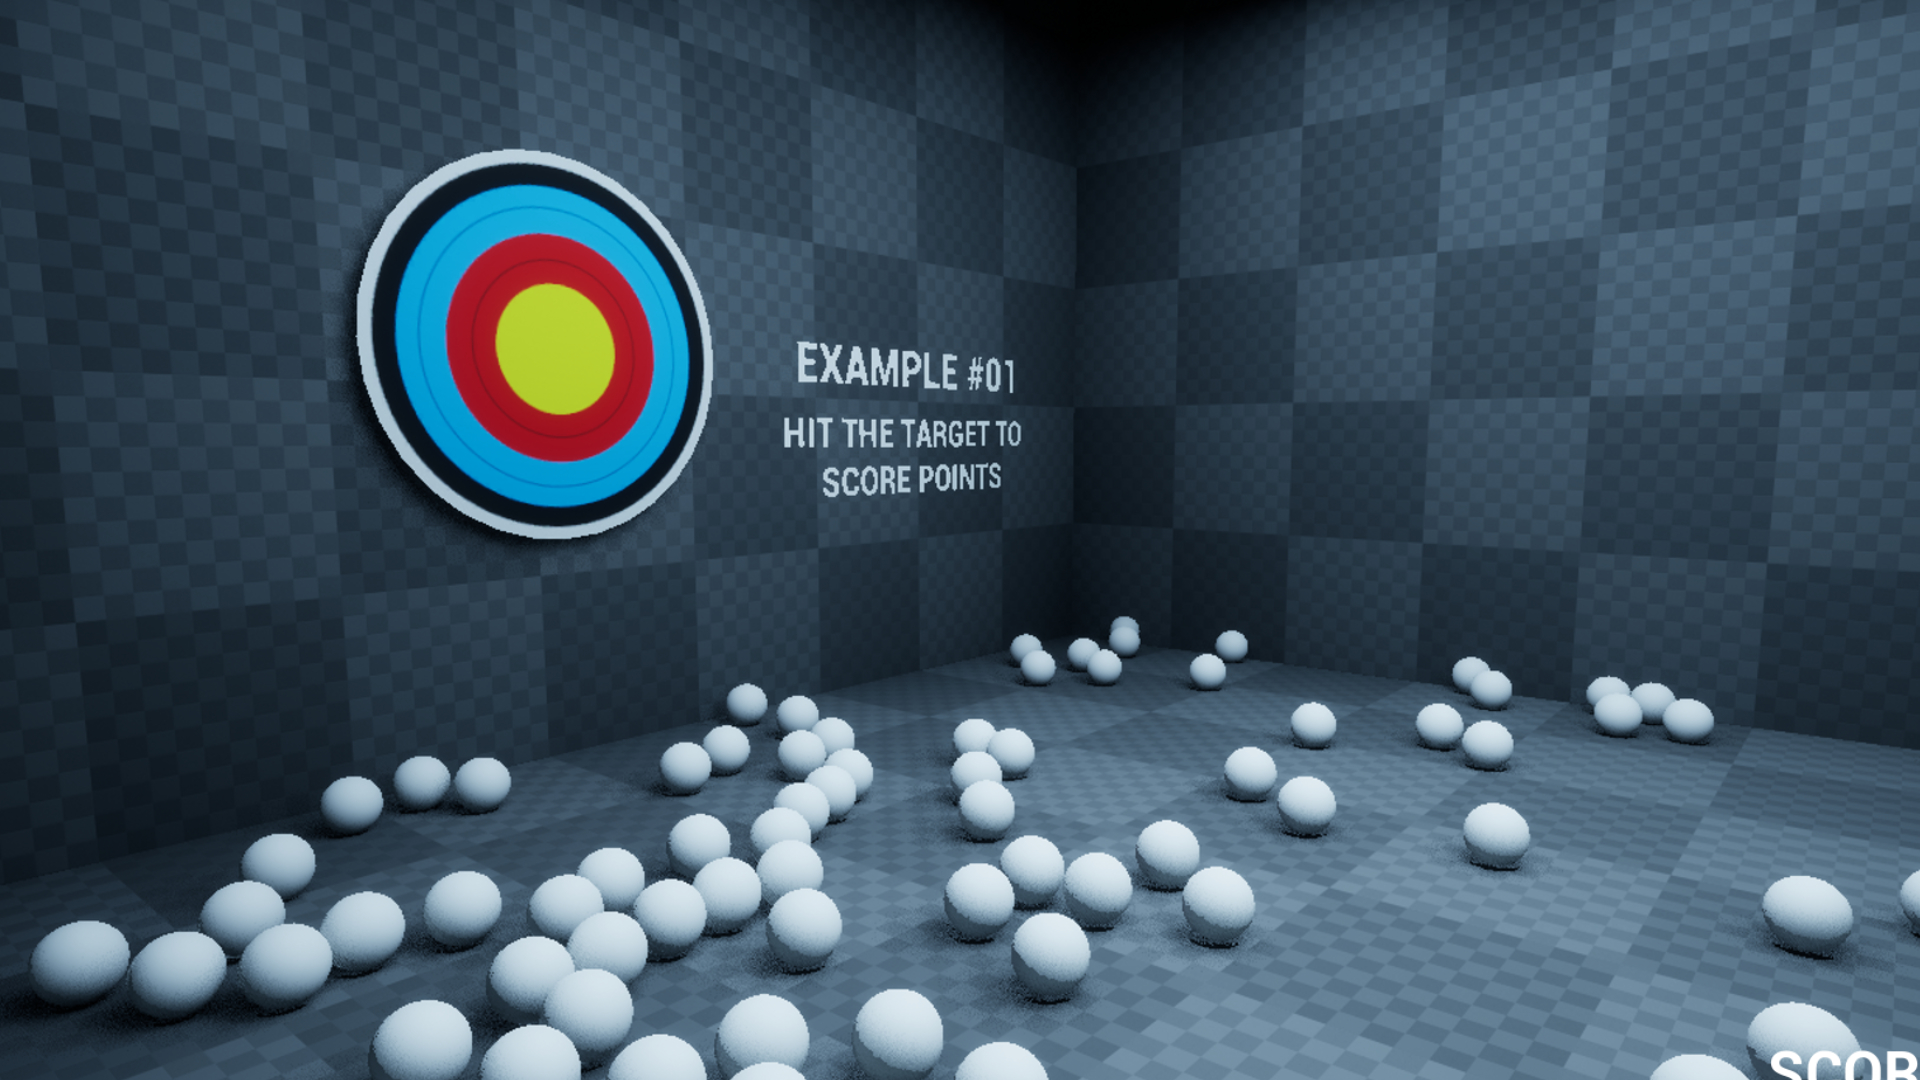
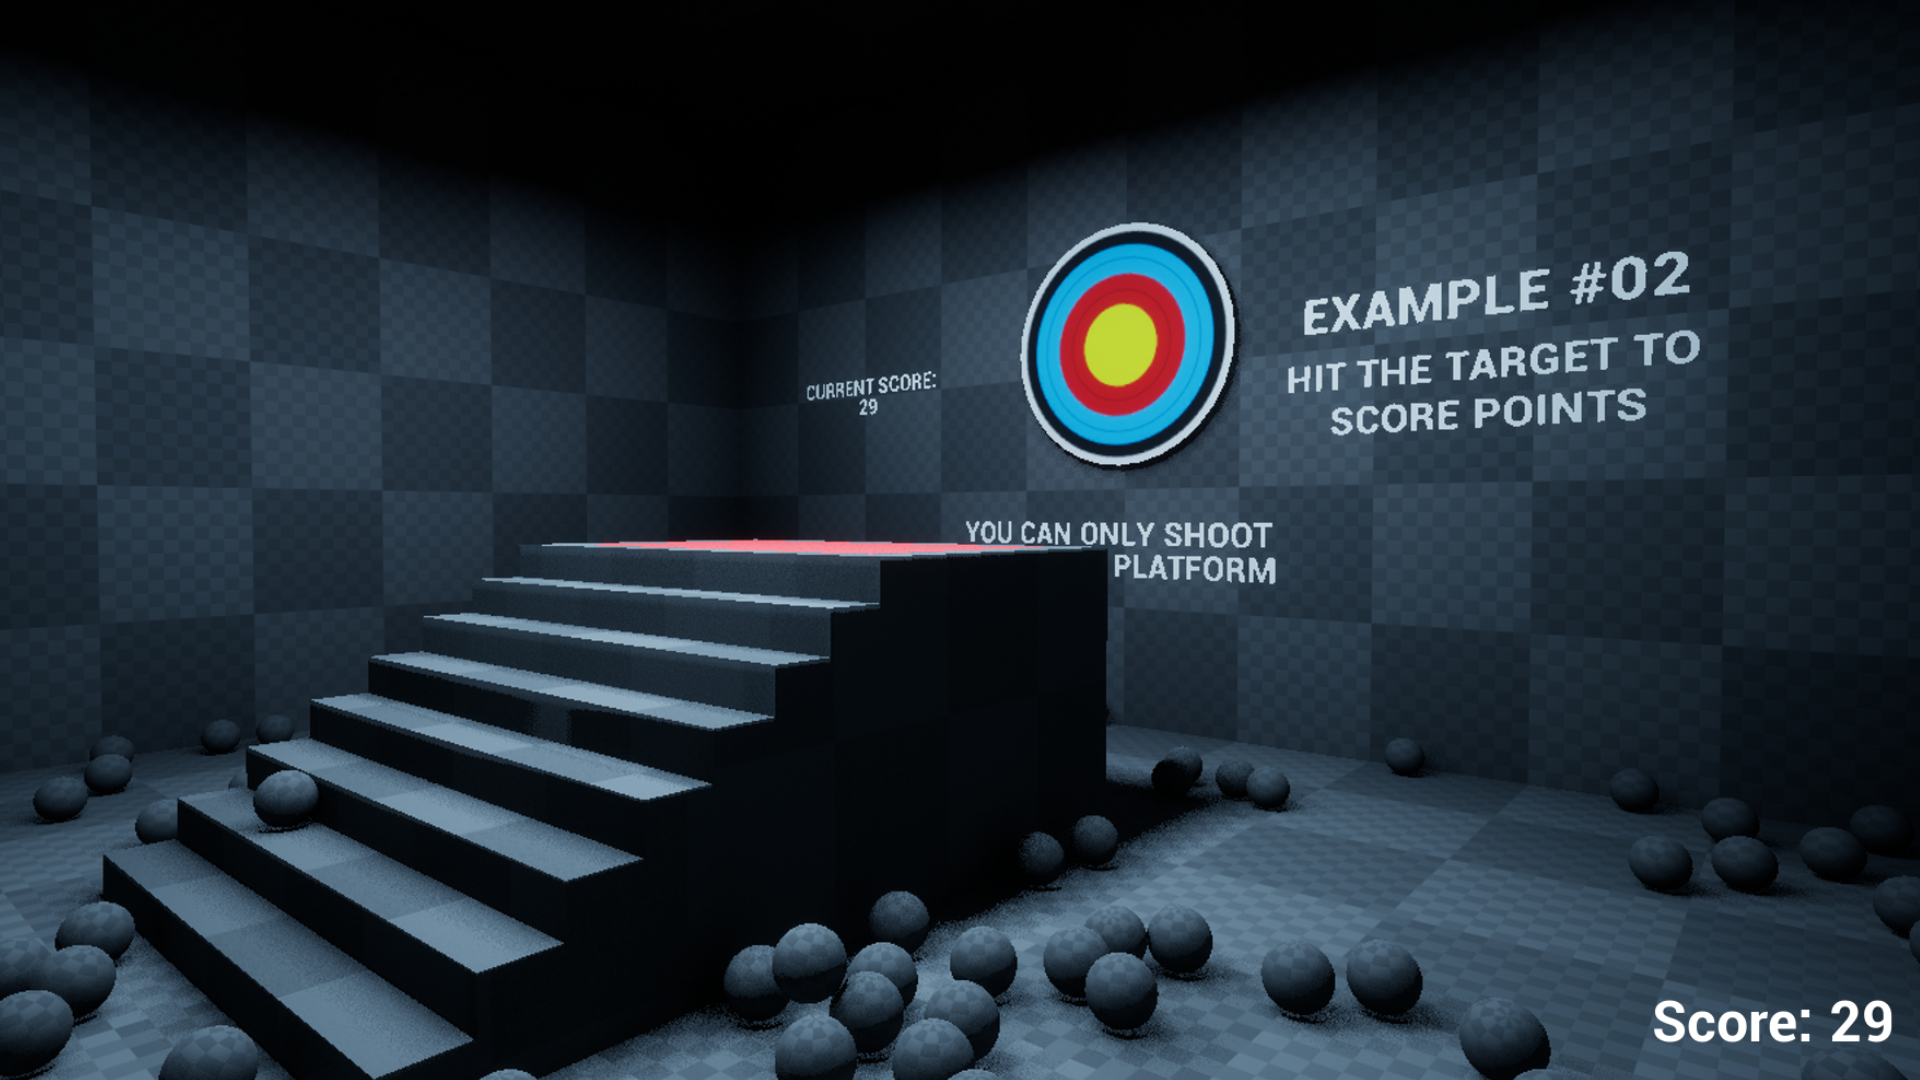
For this first example, we have a large target board and a set of stairs. The player can only shoot the target with projectiles (HitEvent) when standing on the red platform (Overlap event).
In BP_Character_Example_01, you can see that it has no knowledge of any overlaps or hits in the scene, it simply draws a Widget on the screen for the score and when “Interact” is pressed it checks if we can fire. If we can, then it spawns a projectile and plays a sound. The Overlaps and Hits that control how we can score and when we can shoot is all dealt with by other actors.
Overlap
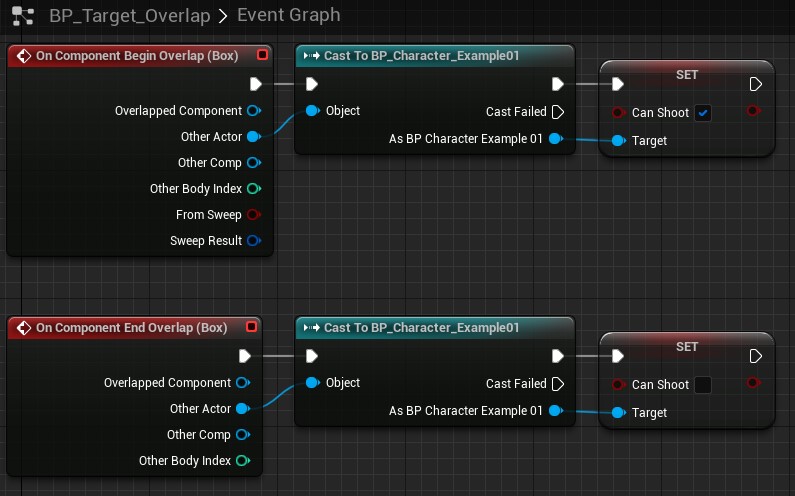 The Blueprint graph for BP_Target_Overlap.
BP_Target_Overlap contains both BeginOverlap and EndOverlap events created by right clicking the BoxCollision (Box) in the Component Hierarchy and selecting “Add Event -> Add OnComponentBeginOverlap” and “Add Event -> OnComponentEndOverlap”. These events trigger when this component has another actor overlap with them and when that overlap ends.
Note: If you wanted to filter out specific actors for this overlap event, you could either cast from the “OtherActor” pin or set the collision response in the Details of the BoxCollision accordingly (such as ignoring all actors of all types apart from Pawn, which you would set to Overlap).
When BeginOverlap is triggered, we check to see if that other actor is BP_Character_Example01. If it is, let them know that they can shoot. We do something similar when EndOverlap is triggered, we check if the actor leaving our Overlap is BP_Character_Example01. If that is the case, we tell them they can’t shoot anymore.
Hit
 The Blueprint graph for BP_Target.
BP_Target has a large target mesh with automatically generated convex collision applied to it. Like with BP_Target_Overlap, BP_Target has an OnComponentHit event generated via right clicking the StaticMesh actor and selecting “Add Event -> Add OnComponentHit”. When the StaticMesh has been hit, we check to see if it was a projectile that hit the mesh. If it was, play a sound and increase our score.
Note: You can also use the same tricks for Hits as you can with Overlaps, either casting the OtherActor result or setting the CollisionProfile to only allow specific actors to trigger them.
Example #2 - Target Practice (C++)
This second example is a like-for-like recreation of the first example with C++ components to help show how you achieve basic Hits and Collisions in C++.
Overlap
KFShootVolume.h is where our overlaps are dealt with in Example 02. Within the .h, you can see the declarations for the two overlap functions.
The specific functions are at the bottom of the class. Both of the functions are designed to take in what the internal Overlap Delegates push out so that we can correctly understand the Delegate and act upon it accordingly.
To see how we make these functions trigger when the overlap happens, we need to switch over to KFShootVolume.cpp.
If we take a look inside the BeginPlay() function, we can see that we get the component we wish to listen to the overlaps on and add our UFUNCTIONS to the Delegates that will be broadcast.
Looking at the first of the two lines of code what we are doing is getting the Box Component and getting the Delegate for BeginOverlap. From there, we are telling that Delegate that we wish to be informed when it is fired. We do this by telling it to execute a function in our class and specifically that we want it to trigger the OverlapBegin function.
Because of what the Delegate will broadcast (in terms of variables) matches with that function, it will correctly passthrough the data and execute our function when the Delegate is triggered.
One important trick to know is the ability to find out what variables are needed for the bind to correctly take place. One trick is to write out the “AddDynamic” code (which in our BeginOverlap case is Box->OnComponentBeginOverlap.AddDynamic) and head to the definition of OnComponentBeginOverlap (by clicking OnComponentBeginOverlap and pressing F12 in Visual Studio / Rider). This should take you to the Delegate that is being sent through.
Go to the declaration of the Delegate (Remember, F12 is the hotkey for VS/Rider) and you’ll see the function we need. Simply copy the variables and paste them into the function declaration of our intended UFUNCTION. Be sure to remove the extra commas that are added as part of the Delegate declaration and your function now matches the Delegate and will be compatible with the delegate broadcast.
The location of our AddDynamic is important to note; Adding them to the constructor means that what we are trying to bind to is not ensured to be ready yet and can often lead to crashes. We also do not need these binds whilst in the editor - it is strictly a runtime requirement. Because of this, you should place binds such as Overlaps, Hits and similar such delegate bindings on BeginPlay - which fires once the game has started and this object has been created.
In our functions for OverlapBegin and OverlapEnd, we are doing the same thing we did back in the Blueprint sample; we check to see if the Actor that triggered this Overlap is the player. If they are, then set if they can or can’t shoot.
Hit
As we’ve said a few times before this, Hits and Overlaps share some commonalities, especially when it comes to how they broadcast to other classes. C++ Hits are no exception. We can see this with the declaration of our Hit function within KFShootTarget.h which is strikingly similar to how we handled Overlaps in the previous class.
Specifically the part at the end of the class; the Hit function itself.
To fully understand the variables provided, we can head over to the .cpp file to see something similar to what we had when dealing with the Overlaps.
Just like with the Overlaps, on BeginPlay(), we are grabbing the component we want to listen out for Hits on then we are grabbing the Hit Delegate. From there, we’re adding our UFUNCTION to trigger when this Delegate broadcasts. Again, it is important to remember the why we have put this on BeginPlay() and not in the constructor, as well as how to find the variables the Delegate requires to be present to correctly broadcast to our function. These are covered in the Overlap section so jump back if you need a refresher.
Just like with the Blueprint this is inspired by (in Example 01) when the hit has been broadcast to us, we are checking to see if it was a projectile. If it was, play a sound, increment our score and update the score in places that are waiting for it.
Example #3 - Dunk Tank (Blueprint, Networked)
Example #03 is similar to the first two examples but with slight tweaks to better show alternative options and to offer something a little different. This is a simple multiplayer sample, where one player needs to step on the green trigger to make the target appear. The other player then stands on the red trigger and is able to shoot the target. If the player successfully hits the target, both players will see the chair in the test tube light on fire for three seconds.
Note: It is important to note that any actor or class within this example that is using replicated variables or functions / events are marked have their Replicated bool set to true. You can see this in the Class Defaults of each of the classes in question.
Overlap
First, we can look at BP_Target_Overlap_Red to show an example approach for multiplayer overlaps. Inside the graph, you can see a method similar to what we have done previously. Within BP_Target_Overlap_Red, we have OverlapBegin and OverlapEnd events. From here, we are casting to the character and sending off for a specific event (in this case to enable or disable shooting).
The main difference this time is that we’re speaking directly to the CLIENT’s version of the character in a multiplayer match as opposed to just whatever version overlapped with us. The reason for this is to protect against a slow network and to ensure this event is correctly fired on both the client and the server.
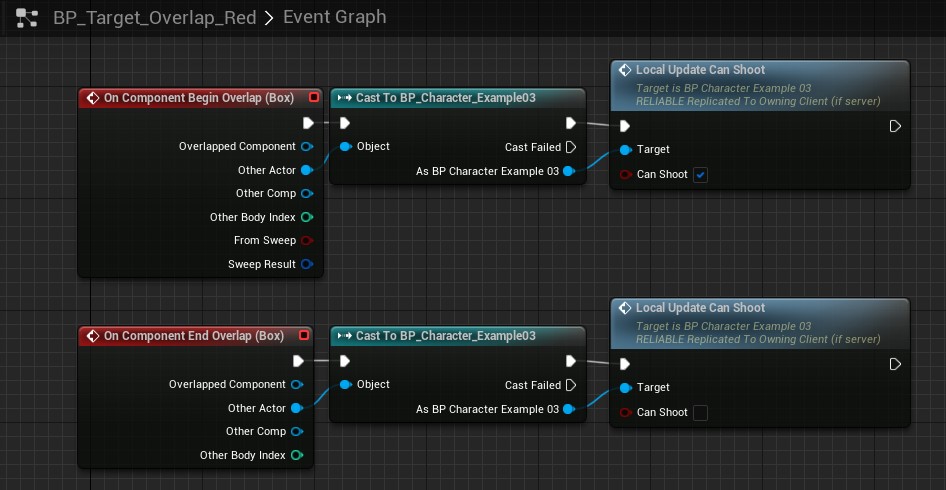 The Blueprint graph for BP_Target_Overlap_Red.
If you follow the event that is fired on the player’s character, you’ll see that we update the client’s variables before they go off and tell the server.
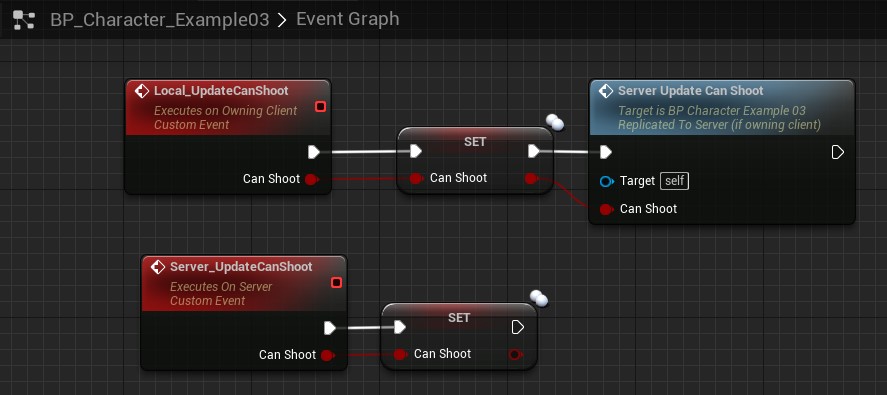 The Client-first approach in BP_Character_Example03.
Naturally, this method is not very secure but ensures that when playing online, the person playing as the client does not have to wait around for the server’s response before acting, reducing the feeling of lag.
If we take a look at BP_target_Overlap_Green we can see an alternative approach to overlaps in multiplayer. Within this Blueprint, we immediately send the result of BeginOverlap and EndOverlap to the server to deal with. The server then decides what to do - which in this case is confirm its a Example 03 Character that caused the Overlap to trigger and then tell both the server and client version of the Character to play the show (or hide) animation on the target Actor, which ironically, in this case, is an actual Target.
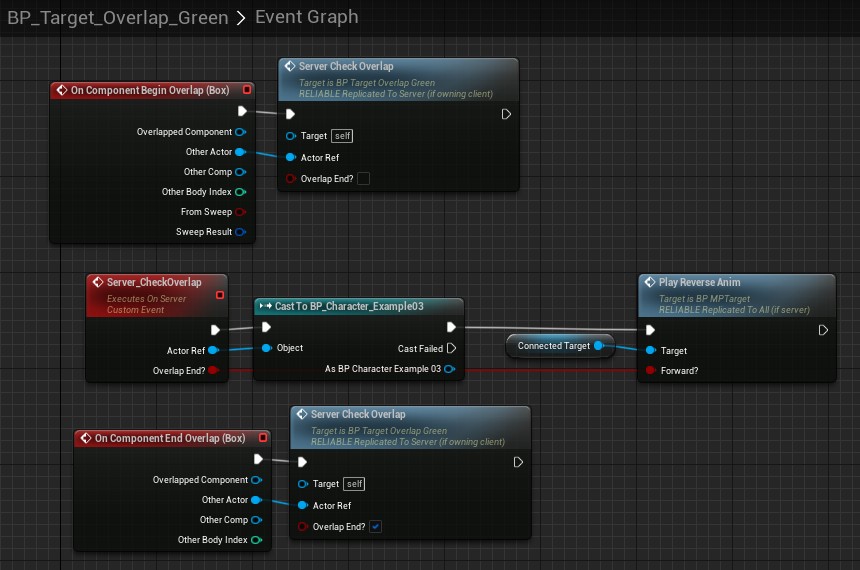 The Blueprint graph for BP_Target_Overlap_Green.
Hit
BP_MPTarget is our multiplayer version of the Target that existed within the previous examples. You’ll see that the approach taken is quite similar to the previous examples, only instead this time we are triggering a server event at the end of the OnComponentHit execution line. There are also some extra nodes this time around in the Blueprint but these only exist to add the animation to the actor and are not related to making this class more multiplayer friendly.
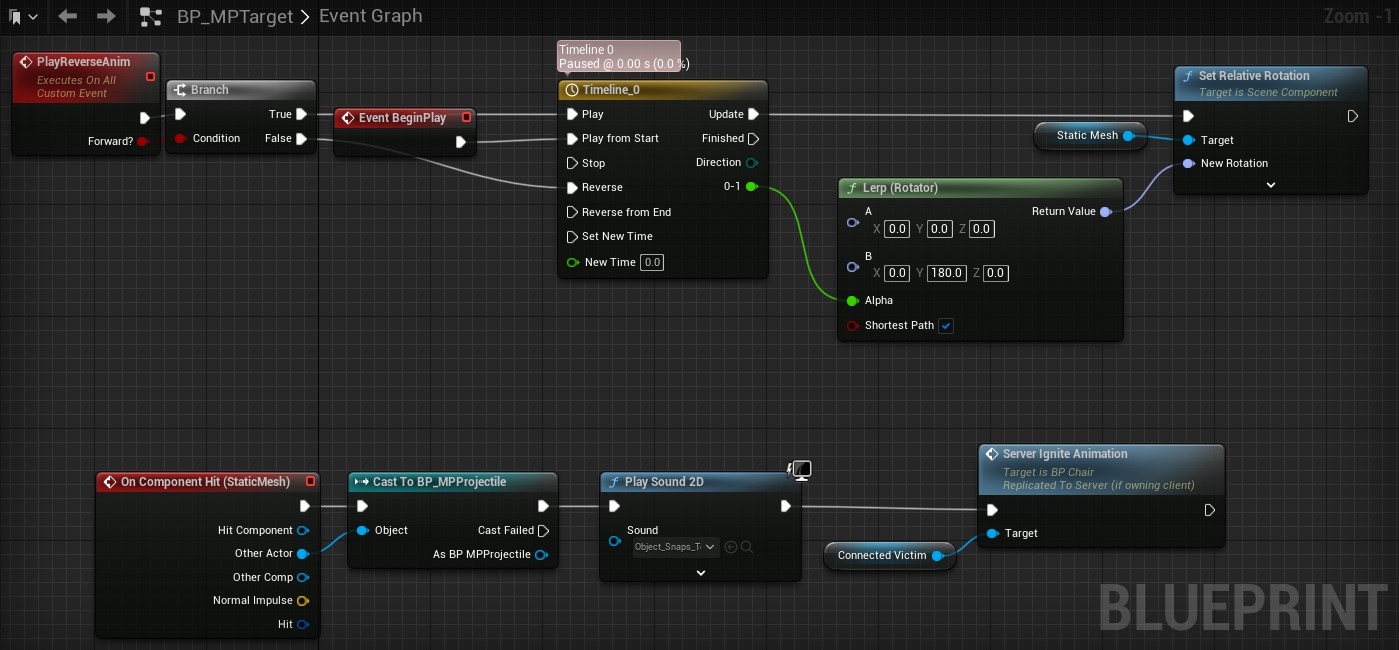 The Blueprint graph for BP_MPTarget.
Example #4 - Dunk Tank (C++, Networked)
Example 04 is a C++ version of the third Example, which you can use to understand how to achieve what we did in Example 03 within the confines of C++.
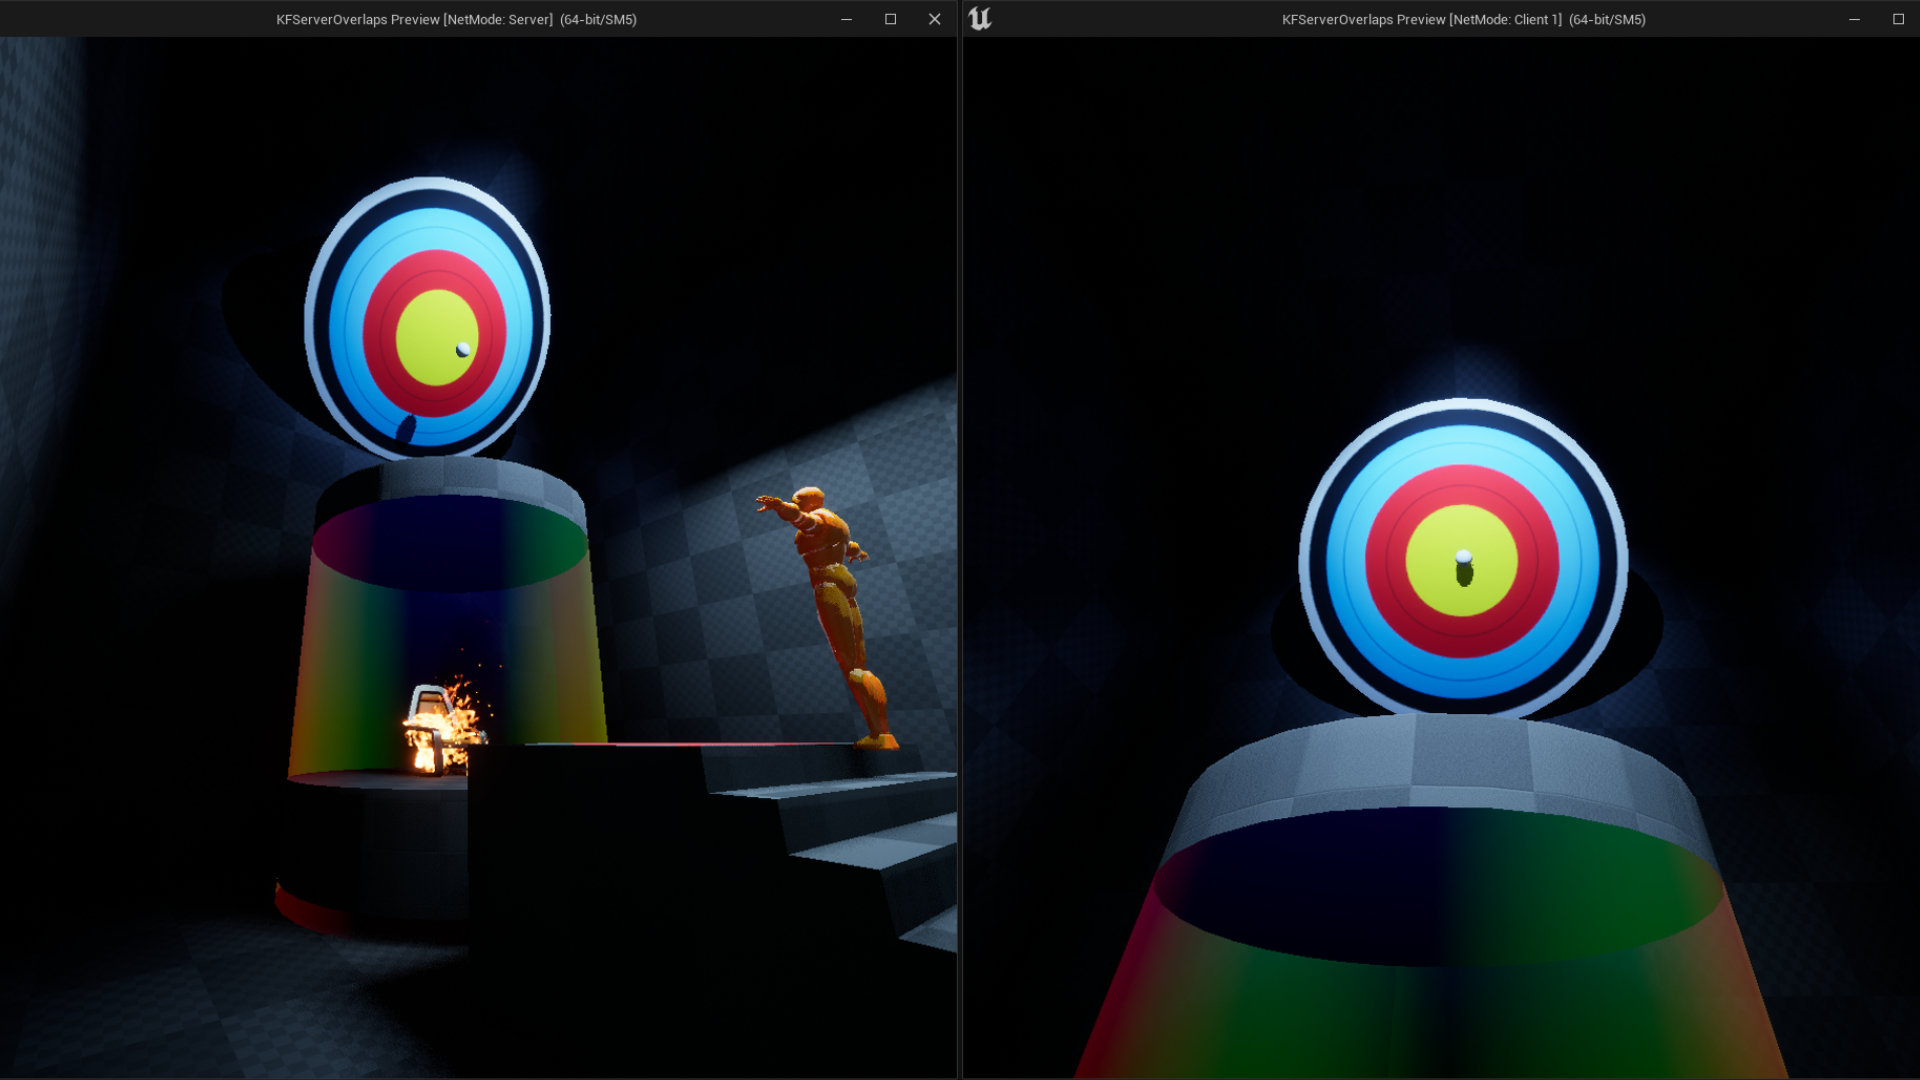 A screenshot of Example 04, can you notice the difference? Of course you can’t, it is the same image.
Overlap
The Overlaps in C++ are done just as Example03 did it - where KFMPOverlap_Red and KFMPOverlap_Green perform their networking in slightly different ways. The interesting one I wanted to draw attention to is KFMPOverlap_Green, as it deals with the networking as part of the Overlap flow.
Within the .h file, you’ll notice that both BeginOverlap and EndOverlap are written exactly as they were in Example 02. However, just like with Example 03, we now have a Server_CheckOverlap() function which we will pass our Overlap response in for the server to deal with.
Heading over to the .cpp, you can see that we bind our Overlaps exactly as we did before. However, when we look at the implementation of our functions you can see we immediately call to Server_CheckOverlap() - just like we did in Example03. It is a little less clear here why we are doing this so to re-iterate this is an example of a server-authoritative overlap, where we immediately tell the server “Hey, this overlap happened can you make a judgement call on what to do please?”
If you are not used to multiplayer coding in Unreal Engine, some keen-eyed amongst you might have noticed that we defined our Server_CheckOverlap() as UFUNCTION(Server, Reliable) void Server_CheckOverlap(AActor* _ActorRef, bool _bOverlapEnd);, however in the .cpp file it is named Server_CheckOverlap_Implementation. This comes from the UFUNCTION we attached to our function, or more specifically the Server macro. Unreal does magic behind the scenes with the defaults for this function, giving us not just an Implementation but if required, you could also do things like Validation; where the Server has to verify if this function can even occur when it is triggered .etc.
It is strongly recommended to check out some of the properties you can attach to your UFUNCTIONS and UPROPERTIES; especially when Multiplayer (Replication) is concerned. A great resource for this is either the official Unreal Engine documentation or BenUI’s blog: UPROPERTY / UFUNCTION.
Hit
The Hit in C++ is done in KFMPShootTarget. In KFMHShootTarget.h, you can see we define our HitMesh() function just as we did in the offline sample.
Within KFMPShootTarget.cpp, you can see that we bind the Hit in the BeginPlay before we setup the Timeline alternative. It doesn’t matter what order the specific bind for Hit happens, as long as the actor is ready and we’re in-game. When the Hit is triggered (HitMesh()), we check the Bullet like we did in Example03 and fire off the Server event on that bullet.
Extras
Video
Project Files
The project files for this project (Unreal Engine 5.0 EA) are available here: PROJECT FILES

